
 Shopping Guide
 HELP / FAQs


 By onemall
 TL;DR
An ita bag is a bag with a clear display window for pins, badges, acrylic charms, keychains, plush and other fan goods. Choose the bag by the usable window and insert size—not by the outside dimensions. A3 and A4 describe familiar paper-size classes, while many brands also sell S, L and LL sizes that are not interchangeable across product lines.
- First bag: use a removable insert and plan the layout before attaching anything.
- Can badges: divide the usable window width and height by the badge diameter plus spacing.
- Acrylic goods: secure them independently so they do not swing and scratch the clear panel.
- Importing: dimensional weight can matter more than the empty bag’s scale weight.
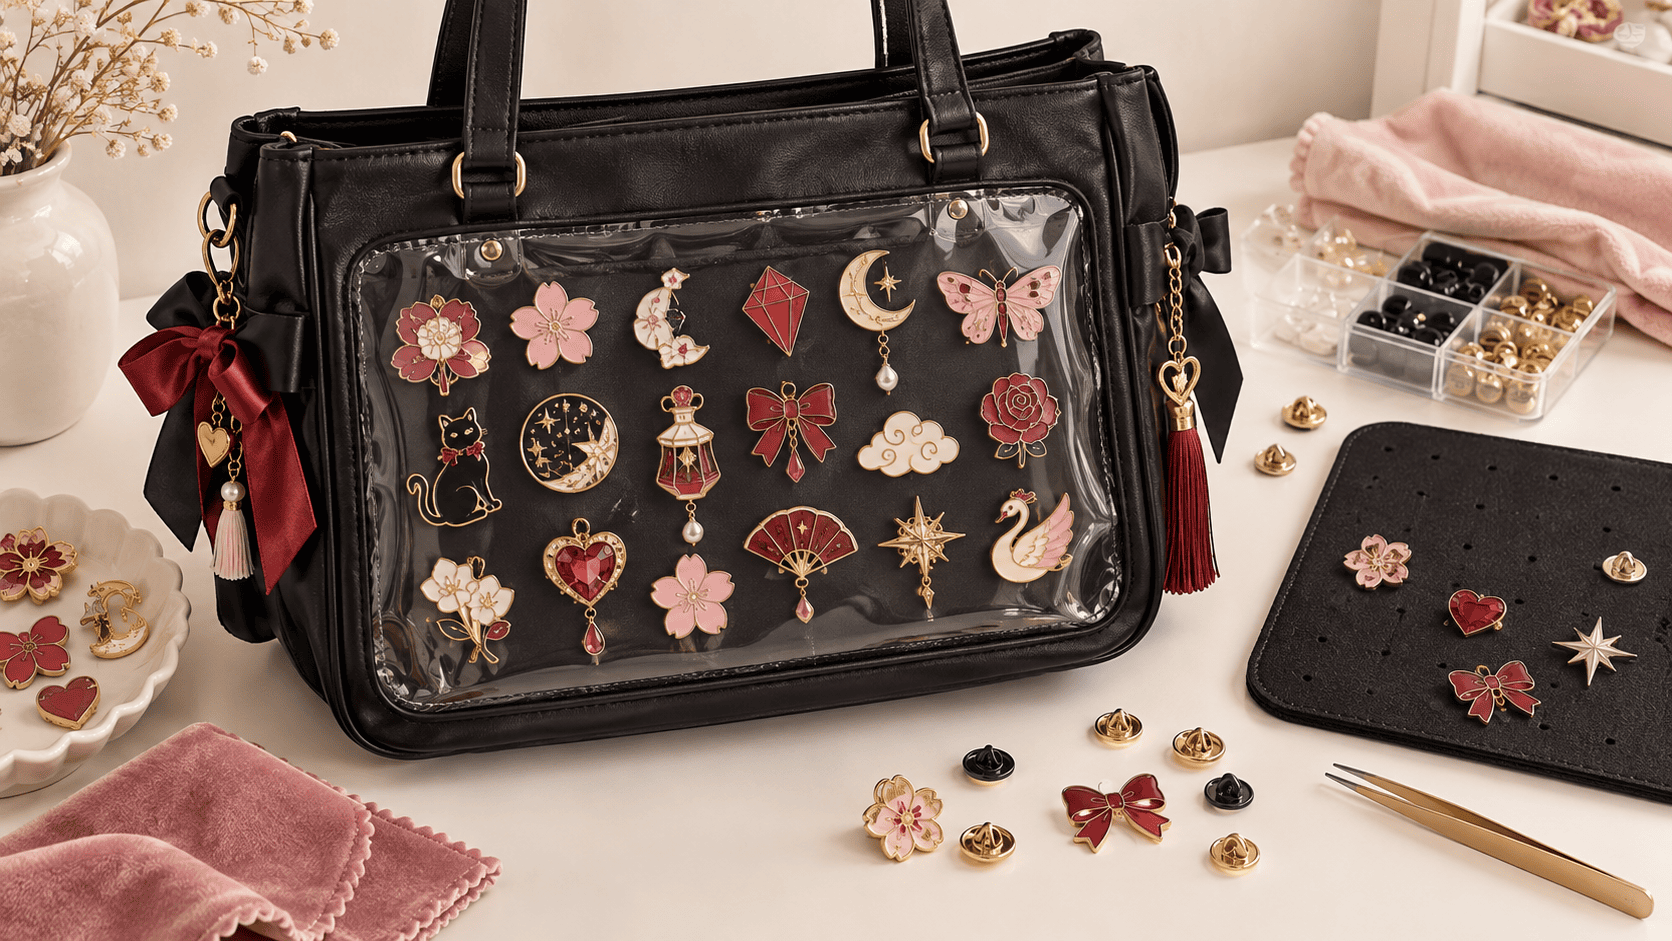
Current Japanese retail shows the category expanding from classic pin displays to plush-display Boston bags, backpacks, mini shoulder bags and convertible designs. WEGO’s current ita-bag collection includes S, L and LL bags as well as dedicated nui bags.[1] That supports a broad query cluster: ita bag, itabag, anime pin bag, ita bag insert, A4 ita bag, A3 ita bag, ita bag backpack, ita bag for plushies and how many pins fit in an ita bag.
What Is an Ita Bag?
The Japanese term 痛バッグ literally suggests a bag that is “painful” to look at or expensive to assemble because it is densely decorated with devotion to one character, performer or series. In practical shopping terms, the defining feature is a clear display area separated from the main carrying compartment. The display may contain a removable mesh sheet, fabric board or pocket.
An ita bag is not automatically protective. Pin backs can loosen, acrylic parts can rub, and a flexible PVC window can crease. Treat the clear panel as a display surface and the insert as the structural layer. Keep keys, bottles and heavy objects in a separate compartment whenever possible.
Ita Bag Size Guide: S, A4, A3, L and LL
| Size label | Typical use | Advantages | Check before buying |
|---|---|---|---|
| S / mini | One focal character, small badge grid or daily use | Light, less expensive to fill | Usable window may be much smaller than bag |
| A4 class | Medium pin layout, event essentials | Common balance of display and portability | Confirm portrait vs landscape orientation |
| L | Larger displays and mixed merch | More spacing and room for an insert | Brand-specific dimensions |
| A3 / LL | Dense badge grids or large acrylic arrangements | Maximum impact | Weight, shoulder comfort and dimensional shipping |
| Nui bag | Plush display | Extra depth for mascots | Internal height, zipper opening and ventilation |
WEGO explicitly describes one LL lace-up bag as an A3-size model and notes that its internal divider can be removed to change the compartment layout.[2] Its S products, by contrast, use an S-compatible reversible sheet and may include plush-lined pockets, penlight straps and internal organizers.[3] Use those labels within the same product family; do not assume every seller’s “S” has the same insert dimensions.
How Many Pins Fit in an Ita Bag?
Calculate from the clear window, not the paper-size name. For a simple grid:
- Measure the usable window width and height in millimeters.
- Measure the badge diameter, including any rim that overlaps the design.
- Add your preferred gap—often 5 to 15 mm—between badges.
- Divide window width by badge diameter plus gap and round down.
- Repeat for height, then multiply rows by columns.
For example, a usable window of 300 × 210 mm does not necessarily fit five 57 mm badges across once margins and spacing are added. Build a paper template at full scale. Place the actual badges or traced circles on it, then photograph the final layout before pinning. Fan or diamond layouts look fuller but use more variable spacing.
Duplicate badges create a uniform “shrine” design, while mixed sizes create a collage. Neither is objectively better. If you mix 44 mm, 57 mm and 75 mm can badges, anchor the largest item first and fill negative space with smaller pieces rather than trying to preserve a strict grid.
Choosing an Ita Bag Insert
Mesh inserts
Mesh makes it easy to move pins without puncturing the bag lining. Check mesh stiffness and whether pin backs catch on adjacent threads. A removable insert also lets you build the layout flat and transfer the whole display into the bag.
Fabric boards
Fabric-covered foam or plastic boards provide a clean backdrop and can be cut to fit. Use acid-free materials for long display periods when possible. Avoid permanent adhesives on valuable paper goods.
Reversible and coverable displays
Some current Japanese designs include a reversible mesh/fabric sheet or a flap that hides the decoration. WEGO describes inserts that can be reversed to conceal the display and internal access that keeps the exterior clear surface tidy.[4] This is useful for commuting, rain protection and venues where a large display is inconvenient.
How to Attach Badges, Acrylic Stands and Keychains
- Can badges: use locking backs or pin-back protectors, and inspect them after travel.
- Acrylic keychains: attach through short chains or clear loops so the piece cannot swing into another acrylic surface.
- Acrylic stands: display only lightweight parts that can be secured flat; carry bases separately in a padded pocket.
- Paper cards and bromides: sleeve them first and mount the sleeve, not the collectible.
- Plush mascots: use two attachment points when possible and keep the ball chain as a secondary attachment.
- Rosettes: confirm the depth of the clear pocket before adding thick ribbon layers.
Do not overload the clear pocket until it bows. Pressure can mark acrylic goods and distort the PVC panel. A current WEGO frame model highlights a full-opening clear pocket, extra depth for thicker items and protective internal storage—features worth checking on any brand.[5]
Japanese Search Terms for Ita Bags
| Query | Meaning | Best use |
|---|---|---|
| 痛バッグ / 痛バ | ita bag / short form | General shopping |
| 痛バッグ A4 / A3 | size class | Medium or large bags |
| 痛バッグ シート | ita-bag insert | Replacement display boards |
| 缶バッジ 痛バッグ | can-badge ita bag | Pin-focused layouts |
| ぬい 痛バッグ | plush ita bag | Deep clear pockets and Boston bags |
| 痛リュック | ita backpack | Hands-free carrying |
| 痛バッグ 中古 | used ita bag | Discontinued colors and lower prices |
Used Ita Bag Condition Checklist
- Inspect the PVC window for clouding, yellowing, creases and sticky surfaces.
- Check handle bases, shoulder-strap anchors, zippers, corner wear and bottom studs.
- Confirm that the removable sheet, dividers, shoulder strap and decorative ribbons are included.
- Look for pin holes in non-removable fabric and color transfer from dark accessories.
- Ask for internal dimensions and weight; seller measurements can differ from catalog dimensions.
- For synthetic leather, check peeling around folds and handles.
WEGO also warns that stacked storage can cause color migration on some products.[6] A used bag can look clean in a front photo while the clear panel is cloudy at an angle, so request side-lit photos.
Cheap and Cheapest Ita Bag Strategies
A cheap first bag should have an intact window, functional zipper and included insert. The cheapest listing may lack the insert or shoulder strap, making it more expensive after replacements. Compare current retail sale prices against used listings; Japanese fashion retailers sometimes discount older colors while the structure remains current.
Large A3 bags occupy substantial box volume. International shipping is charged using the greater of actual weight and volumetric weight, calculated as length × width × height ÷ 5000 in centimeters. Folding a structured bag can crease the clear panel, so “smaller packing” is not automatically safe. Ask for a box that protects the window and handles.
How to Buy an Ita Bag From Japan
Search WEGO and other Japanese retailers by product code, then compare Mercari and Yahoo Auctions for discontinued colors and used inserts. OneMall can purchase eligible marketplace listings. LinkBuy accepts an eligible Japanese-store URL, but lottery items, purchase-limited products, Japanese-ID-required listings and merchant-account items cannot be purchased.
Service fees are ¥300 per item on most marketplaces; from ¥200 per item on Yahoo Auctions and LinkBuy. The first six orders consolidate free; each additional order is ¥100. Storage is free for 90 days after arrival (30 days after consolidation). Optional unboxing photos cost ¥500 or ¥700; a wrong/missing-item check costs ¥200 where supported.
Search 痛バッグ listings, compare WEGO ita bags, or use LinkBuy for an eligible retailer page.
Frequently Asked Questions
What size ita bag should a beginner buy?
An S or A4-class bag is easier to fill and carry. Measure the usable window and test your layout on paper before ordering.
Is an A3 ita bag twice the size of A4?
A-series paper area doubles from A4 to A3, but bag windows do not necessarily equal exact paper dimensions. Verify the product’s window and insert measurements.
How do I stop pins from falling off?
Use reliable backs, add pin-back protectors, secure the insert inside a closed display pocket and inspect the layout after travel.
Can I put plush dolls in a normal ita bag?
Only if the clear pocket has enough depth and a secure opening. A dedicated nui bag is usually better for three-dimensional plush.
Last updated: 2026-10-12.
References
- WEGO official ita-bag collection, checked October 12, 2026. https://wego.jp/collections/itabag
- WEGO official Lace-Up Ita Bag LL / A3 product page. https://wego.jp/products/wg25ss04-g0007
- WEGO official Tokimeki Memory Ita Bag S product page. https://wego.jp/products/wg26ss06-g0002
- WEGO official Tokimeki Plain Ita Bag S product page. https://wego.jp/products/wg23aw11-g0001
- WEGO official Lace-Up Frame Ita Bag S product page. https://wego.jp/products/wg23aw11-g0004
- WEGO official Lace-Up Ita Bag S care and feature page. https://wego.jp/products/wg21sp01-g0001